How to Add Tomcat Server in Eclipse? To develop the Java-based web application in Eclipse, we need Eclipse IDE for Enterprise Java and Web Developers, not the normal Eclipse IDE for Java Developers. While using Eclipse Installer choose Eclipse IDE for Enterprise Java and Web Developers, or directly download from here.
Along with Eclipse IDE, we also need to arrange a tomcat server. Download the Tomcat server from here, or you can install it dynamically while adding tomcat with Eclipse because Eclipse will give the option to download the tomcat server.
Make sure that eclipse IDE (JEE) is installed in the computer system. And launch Eclipse IDE by choosing the workspace folder (the folder where projects will be saved).
Configure Tomcat Server with Eclipse IDE
After configuring the tomcat server with Eclipse IDE, we can start and stop the tomcat server from the eclipse IDE, deploy and undeploy web application directly from the Eclipse IDE. For this, we need to link the tomcat server with IDE.
Go to Window menu and choose preferences:- Window => Preferences

In Preferences windows go to Server option => Runtime Environment.

The New server runtime environment window will appear. Here, click on Add => Select the Tomcat server version you want to configure. I have tomcat server version 10, and I want to configure this tomcat server version with Eclipse IDE therefore I’m choosing Apache Tomcat v10.0.

Select Apache Tomcat version=>Browse and choose tomcat installation folder (where tomcat server is installed i.e. <Tomcat_home>). If you don’t have a tomcat server then from here itself also you can download the tomcat server. My tomcat server is installed at D:\Installed\Web Servers\Tomcat10 therefore I am selecting this location.

Now, click on Finish button => Apply and Close.
Create a Server for Current Workspace
The tomcat server is configured successfully with the Eclipse IDE. In the Servers view currently, we are getting:- “No servers are available. Click this link to create a new server.”

If you are not getting this view then you can get it from Window => Show View => Other => Search for “Servers” => Select Servers. Now, you can see the all available configured Servers.
Click on the link to create a server. It will fetch the recently added tomcat server.

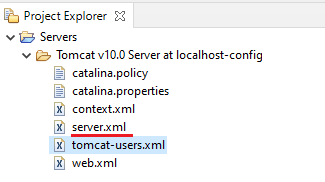
Click on the finish button. It will save the tomcat server at localhost. Now we can see a server application in Project explorer.

It is not the original tomcat server installed at D:\Installed\Web Servers\Tomcat10, it is a copy of the original tomcat server. Both are separate tomcat servers of the same version, at the same connector port number. Therefore,
- We can’t run both tomcat servers at a time, because they have the same port number for the connector.
- The configuration files (server.xml, tomcat-users.xml, and e.t.c.) are different from each other. The modification done in the original tomcat server won’t reflect in Eclipse’s tomcat server, and vice-versa.
- The deployed web application in Eclipse’s tomcat server will not be available at the original tomcat server, and vice-versa.
Change Shutdown Port number
Tomcat server contains three types of port, they are:- shutdown port, redirect port, connector port. All those ports must be valid. When we configure the tomcat server with Eclipse IDE then by default it contains a shutdown port as “-1” which stops Eclips to start the tomcat server.
If we don’t change the shutdown port to a valid port number then In this case we will get the following error,
Problem Occurred:- ‘Starting Tomcat Server at localhost’ has encountered a problem. Server Tomcat v10.0 Server at localhost failed to start. The server cannot be started because one or more of the ports are invalid. Open the server editor and correct the invalid ports.
In Project Explorer, go to the “Servers” application, and open the server.xml file. By default, the port number will be “-1”, which is invalid. Change this port number, and save the file (Ctrl+S). Don’t forget to save the file else modification will not reflect.

In the windows operating system, we get 1 to 65,536 ports. Among these from 1 to 1024 port numbers are reserved for the Windows operating system services. And 1025 to 65,536 is used for external software. Example:- Oracle s/w, MySQL s/w, and e.t.c. In Eclipse’s tomcat server assign the port number which is not already used by any other software. This port number must be different from the port number of the original tomcat server. You can choose 7000, 3030, 4040, and e.t.c. port numbers which are rarely used by any software.
If the port number of the tomcat server in Eclipse IDE is not valid or similar to the port number of any existing software or original tomcat server installed in the computer and that software are in running mode then we will get the following error which starting the Eclipse’s tomcat server:- Problem Occurred:- ‘Starting Tomcat Server at localhost’ has encountered a problem. Server Tomcat v10.0 Server at localhost failed to start.
See all the problems encountered during tomcat server startup in Eclipse IDE and their solution:- Tomcat failed to start in Eclipse IDE
How to Start and Stop Tomcat server in Eclipse
In the “Servers” view, you can find the start and stop options. Select the server configured with Eclipse IDE => Right-click on it => click on start option.

| Shortcut Key | Description |
|---|---|
| Ctrl + Alt + R | Start the server |
| Ctrl + Alt + S | Stop the server |
After the tomcat server started we will get the following message in console:- org.apache.catalina.startup.Catalina start. INFO: Server startup in [1551] milliseconds.
If you enjoyed this post, share it with your friends. Do you want to share more information about the topic discussed above or do you find anything incorrect? Let us know in the comments. Thank you!