➤ How to Code a Game
➤ Array Programs in Java
➤ Java Inline Thread Creation
➤ Java Custom Exception
➤ Hibernate vs JDBC
➤ Object Relational Mapping
➤ Check Oracle DB Size
➤ Check Oracle DB Version
➤ Generation of Computers
➤ XML Pros & Cons
➤ Git Analytics & Its Uses
➤ Top Skills for Cloud Professional
➤ How to Hire Best Candidates
➤ Scrum Master Roles & Work
➤ CyberSecurity in Python
➤ Protect from Cyber-Attack
➤ Solve App Development Challenges
➤ Top Chrome Extensions for Twitch Users
➤ Mistakes That Can Ruin Your Test Metric Program
Previously, we had seen how to create a Java project in Eclipse IDE to develop the Java program. Now in this post, we will see how to compile and run a Java program in Eclipse IDE. Here we will develop Java Hello World! Program in eclipse IDE and then we will run it inside the eclipse IDE.
Create Java Class
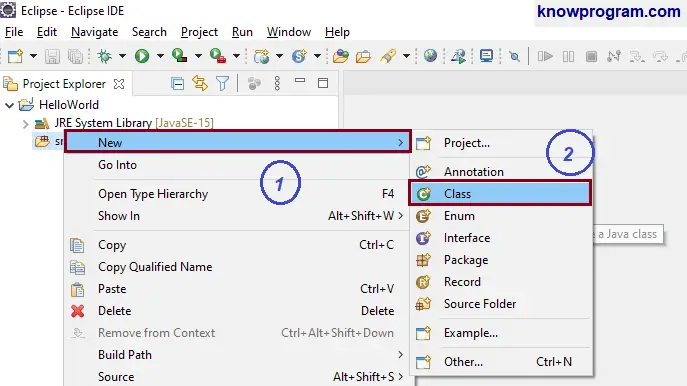
After creating the Java project, select the src folder, right-click on it => New => Class.

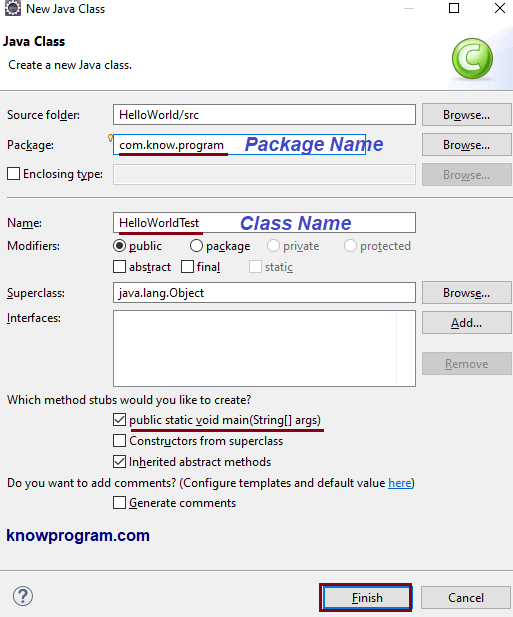
Now, a new window will appear to create the Java class. Here assign the package name, but it optional and it won’t assign package name then we won’t get any error but it is recommended to assign a meaningful package name. Here we will assign package name = com.know.program
After assigning the package name, assign the name of the Class. Since we are developing the java Hello World program therefore we have chosen HelloWorldTest as the class name.

Directly or indirectly java.lang.Object class is the superclass for every Java class. If you are developing some other Java program that needs any interface then you can add them from here or later we can add it while developing the Java program.
Since it is a HelloWorld program that needs the main method, therefore, select the main method. Finally, click on the Finish button.
Develop Java Program
Java code to display Hello World!

package com.know.program;

public class HelloWorldTest {

  public static void main(String[] args) {
    System.out.println("Hello World!");
  }

}
After writing the code, save it using the shortcut CTRL + S
Compile the Java Program in Eclipse
In Eclipse IDE no need to compile the Java program, whenever Eclipse saves the Java program then every time it is also compiling the program itself. If there is an error in the program, then the red icon will come across that particular line, and without solving it we can’t run the program. Therefore no need to compile the Java program, directly run it.
Run the Java Program in Eclipse
To run the Java program in Eclipse select the Java program which contains the main method, right-click on it, Run As => Java Application. The output will be displayed to the console window of the Eclipse IDE.

Output:-
Hello World!
A Java project can contain multiple Java class, interfaces but we can run only those classes which contain the main method. The class which contains the main method is normally called the user class.
Another Ways to Run Java program in Eclipse IDE
1) Shortcut (CTRL + F11):- Open the Java program which contains the main method, and use shortcut key CTRL + F11 to run the Java program.
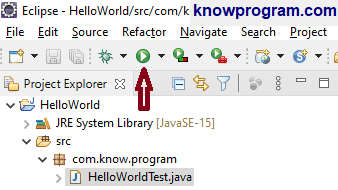
2) Use the button. At the header section of Eclipse IDE, there are many buttons for different purposes. There you can find a button having an icon like a play button. Open the Java program which contains the main method, click on the button.

3) In the Header section of Eclipse IDE we can find the Run option. Select Run => Run As => Java Application.
If you enjoyed this post, share it with your friends. Do you want to share more information about the topic discussed above or do you find anything incorrect? Let us know in the comments. Thank you!